Author: CLIVE BLANCHARDClive is an expert on achieving home energy efficiency at low cost so you can save money in comfort. Archives
July 2024
Categories |
Back to Blog
Stop air leaks in your home25/3/2023 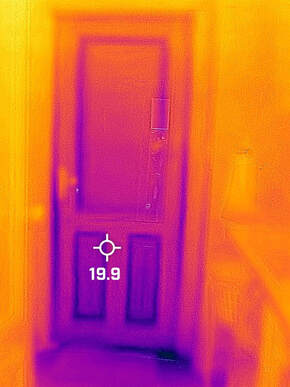 Thermal image of an external door showing the large (dark blue) air leak at the door bottom and a smaller leak at the side. The dark blue around the panels of the door are due to the fact that the panels were routed out and are very thin in those locations. Thermal image of an external door showing the large (dark blue) air leak at the door bottom and a smaller leak at the side. The dark blue around the panels of the door are due to the fact that the panels were routed out and are very thin in those locations. Stopping air leaks in your home can help you save money on heating and cooling bills and increase your home's energy efficiency. Here are some ways to stop air leaks in your home:
1. Identify the leaks: Check for air leaks around windows, doors, and vents. 2. Caulk: Use caulk (no more gaps or similar) to seal any gaps or cracks around windows, doors, and other areas where air may be leaking in or out. Make sure the sealant is appropriate for the location (e.g. exterior, interior, wet area as appropriate) 3. Weatherstripping: Install weatherstripping around doors and windows to prevent drafts. If using self-adhesive weatherstripping, choose one with a plastic backing (rather than paper) as they are much easier to apply. Raven weatherstripping has a plastic backing. The problem with self-adhesive weatherstripping is that if the gap in the door or window frame is too small the weatherstripping gets over compressed, and the door or window won't close properly. An alternative style is available from Ecomaster ecomasterstore.com.au/. They have a range of sealing options for different applications, which tend to work better than what is available at your local hardware store. If you can't afford weatherstripping, at least get yourself a door snake for each outside door and for the room you spend most time in of an evening. 4. Seal air ducts: Make sure air ducts are sealed and insulated to prevent air from escaping. Assuming you have an attic roof, check your airconditioning ducts and if necessary use duct tape to seal them. Any leaks from the ducts are particularly significant as the air in the duct is either hot or cold and under pressure so you can lose a lot of heat. Furthermore this reduces the amount of air entering the room compromising your comfort. If there are problems that you can't rectify yourself it will probably be worth paying to rectifying them. By following these tips, you can significantly reduce air leaks in your home, which can help lower your energy bills and make your home more comfortable. Stopping air leaks in your home can improve comfort in several ways:
If you are planning on doing more to reduce energy use, I suggest you consider creating a plan to ensure you achieve an optimum insulation level and consider what options you should do when. See Energy Audits.
0 Comments
Back to Blog
Get insulation right21/3/2023 Gaps in insulation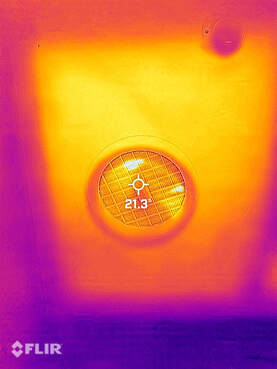 Thermal image showing where unnecessary heat loss (yellow area) is occuring because an electrician tossed aside a whole ceiling bat instead of trimming it. Thermal image showing where unnecessary heat loss (yellow area) is occuring because an electrician tossed aside a whole ceiling bat instead of trimming it. If 10% of the ceiling is bare due to insulation being tossed aside or being incomplete, the heat loss can double.
I have rarely gone into a roof space (even a new one) and found the insulation properly distributed. Since I have bought a thermal imager, I have not found a ceiling without an insulation fault of some sort. The most common issue is ceiling batts tossed aside by a tradesman and not replaced. (Although there are many good tradies, there are too many electricians, air conditioning installers and plumbers who don’t make a habit of checking that the insulation has been returned to the correct place after they have finished their work). If you are employing someone who will be working in the roof space, let them know that any insulation that needs to be removed, needs to be replaced properly (for example trimmed around a fan) Some of the worst examples of failure to replace insulation occur with down lights. If you have down lights you might have a dozen in the room and if a ceiling batt is tossed aside at each light, you would have 12 displaced ceiling batts, which may well more than double the heat loss or gain through the ceiling. Often this can be readily improved if this is in an attic roof space. Do bear in mind that depending on the type of downlight you may need to give a gap, which depending on the light and insulation may need to be up to 100mm clear around the light. Check the make and model of the downlight to determine the clearance required. Although I prefer surface or pendant lights to downlights, some of them, particularly the newer LED downlights can be safely covered with insulation, however check the manufacturer's instructions. Another common issue is ceiling fans. they need a clearance around them to avoid jamming the blades, but often a whole batt is tossed aside. Ideally the ceiling fan should be a ducted fan and discharged above the roof. If the ceiling space is well vented, e.g. an un-sarked tile roof, depending on your climate you may get away with it discharging into the roof until you replace it. However, it is preferable to install a DraftStoppa so that you can safely insulate to the DraftStoppa and also so that when the fan is not working you don't get air leakage and lose the heat or cool in your house. When improving the insulation, gaps in the insulation, for example around framing timbers or at edges, should be filled with offcuts. Insulation that has been wetted or compressed doesn’t perform as well as it should and should be replaced. Manhole covers are often uninsulated. Gluing insulation using a construction adhesive (Liquid Nails) to the top of the cover, will reduce heat loss to the roof. Another issue with insulation is often the extent is insufficient. Ideally the insulation should extend over the top of the walls. If you intend doing the insulation yourself there are a number of considerations:
If you are planning on increasing the insulation thickness, I suggest you consider creating a plan to ensure you achieve an optimum insulation level and consider what options you should do when. See Energy Audits. |
- Home
- Energy Audits
- Scorecard
- New homes
- Passive House
- FAQ Passive House/EnerPHit
- Low cost savings blog
- Save Newsletter
- Architect/builder services
- FAQ 7-Star
- NCC Newsletter
- NCC 2022 Blog
- Greenhouse gases
- Why us
- Contact
- NCC Signed up
- Save Signed up
- Solar
- Gift Cards
- Enquiry thanks
- Sell a home
- Needs Survey
 RSS Feed
|
About Your Low Energy Home
At Your Low energy home our mission is to help you reduce greenhouse gases and running costs of your home. This applies to: Our primary goal is to help people make the most cost-effective decisions to reduce greenhouse gas emissions. Our objective is to work with you to achieve your goals at the level of expenditure which is comfortable for you. This can be achieved while increasing comfort and amenity. |
|